2.9 Post-installation
Configuration of various options follows the successful installation. An option can be configured by re-entering the configuration options before booting the new FreeBSD system or after installation using /stand/sysinstall and selecting Configure.
2.9.1 Network Device Configuration
If you previously configured PPP for an FTP install, this screen will not display and can be configured later as described above.
For detailed information on Local Area Networks and configuring FreeBSD as a gateway/router refer to the Advanced Networking chapter.
                      User Confirmation Requested
   Would you like to configure any Ethernet or SLIP/PPP network devices?

                             [ Yes ]   No
To configure a network device, select [ Yes ] and press Enter. Otherwise, select [ No ] to continue.
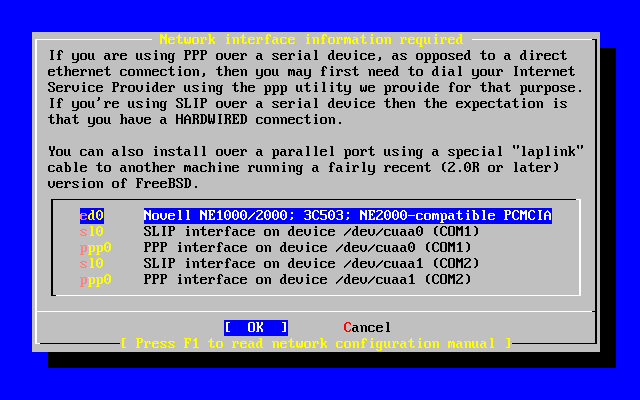
Select the interface to be configured with the arrow keys and press Enter.
                      User Confirmation Requested
       Do you want to try IPv6 configuration of the interface?

                              Yes   [ No ]
In this private local area network, the current Internet type protocol (IPv4) was sufficient and [ No ] was selected with the arrow keys and Enter pressed.
If you are connected to an existing IPv6 network with an RA server, then choose [ Yes ] and press Enter. It will take several seconds to scan for RA servers.
                             User Confirmation Requested
        Do you want to try DHCP configuration of the interface?

                              Yes   [ No ]
If DHCP (Dynamic Host Configuration Protocol) is not required select [ No ] with the arrow keys and press Enter.
Selecting [ Yes ] will execute dhclient, and if successful, will fill in the network configuration information automatically. Refer to Section 19.9 for more information.
The following Network Configuration screen shows the configuration of the Ethernet device for a system that will act as the gateway for a Local Area Network.
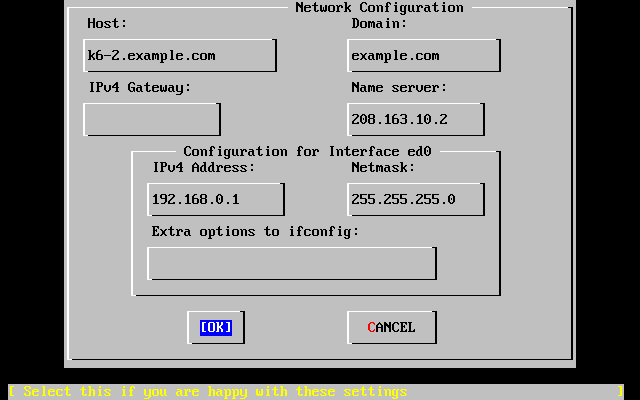
Use Tab to select the information fields and fill in appropriate information:
- Host
-
The fully-qualified hostname, such as k6-2.example.com in this case.
- Domain
-
The name of the domain that your machine is in, such as example.com for this case.
- IPv4 Gateway
-
IP address of host forwarding packets to non-local destinations. You must fill this in if the machine is a node on the network. Leave this field blank if the machine is the gateway to the Internet for the network. The IPv4 Gateway is also known as the default gateway or default route.
- Name server
-
IP address of your local DNS server. There is no local DNS server on this private local area network so the IP address of the provider's DNS server (208.163.10.2) was used.
- IPv4 address
-
The IP address to be used for this interface was 192.168.0.1
- Netmask
-
The address block being used for this local area network is a Class C block (192.168.0.0 - 192.168.255.255). The default netmask is for a Class C network (255.255.255.0).
- Extra options to ifconfig
-
Any interface-specific options to ifconfig you would like to add. There were none in this case.
Use Tab to select [ OK ] when finished and press Enter.
                      User Confirmation Requested
        Would you like to Bring Up the ed0 interface right now?

                             [ Yes ]   No
Choosing [ Yes ] and pressing Enter will bring the machine up on the network and be ready for use. However, this does not accomplish much during installation, since the machine still needs to be rebooted..
2.9.2 Configure Gateway
                       User Confirmation Requested
       Do you want this machine to function as a network gateway?

                              [ Yes ]    No
If the machine will be acting as the gateway for a local area network and forwarding packets between other machines then select [ Yes ] and press Enter. If the machine is a node on a network then select [ No ] and press Enter to continue.
2.9.3 Configure Internet Services
                      User Confirmation Requested
Do you want to configure inetd and the network services that it provides?

                               Yes   [ No ]
If [ No ] is selected, various services such telnetd will not be enabled. This means that remote users will not be able to telnet into this machine. Local users will be still be able to access remote machines with telnet.
These services can be enabled after installation by editing /etc/inetd.conf with your favorite text editor. See Section 19.13.1 for more information.
Select [ Yes ] if you wish to configure these services during install. An additional confirmation will display:
                      User Confirmation Requested
The Internet Super Server (inetd) allows a number of simple Internet
services to be enabled, including finger, ftp and telnetd.  Enabling
these services may increase risk of security problems by increasing
the exposure of your system.

With this in mind, do you wish to enable inetd?

                             [ Yes ]   No
Select [ Yes ] to continue.
                      User Confirmation Requested
inetd(8) relies on its configuration file, /etc/inetd.conf, to determine
which of its Internet services will be available.  The default FreeBSD
inetd.conf(5) leaves all services disabled by default, so they must be
specifically enabled in the configuration file before they will
function, even once inetd(8) is enabled.  Note that services for
IPv6 must be separately enabled from IPv4 services.

Select [Yes] now to invoke an editor on /etc/inetd.conf, or [No] to
use the current settings.

                             [ Yes ]   No
Selecting [ Yes ] will allow adding services by deleting the # at the beginning of a line.
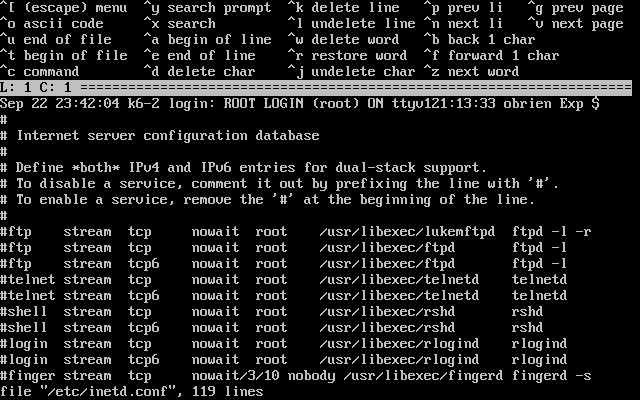
After adding the desired services, pressing Esc will display a menu which will allow exiting and saving the changes.
2.9.4 Anonymous FTP
                      User Confirmation Requested
 Do you want to have anonymous FTP access to this machine?

                              Yes    [ No ]
2.9.4.1 Deny Anonymous FTP
Selecting the default [ No ] and pressing Enter will still allow users who have accounts with passwords to use FTP to access the machine.
2.9.4.2 Allow Anonymous FTP
Anyone can access your machine if you elect to allow anonymous FTP connections. The security implications should be considered before enabling this option. For more information about security see Chapter 10.
To allow anonymous FTP, use the arrow keys to select [ Yes ] and press Enter. The following screen (or similar) will display:
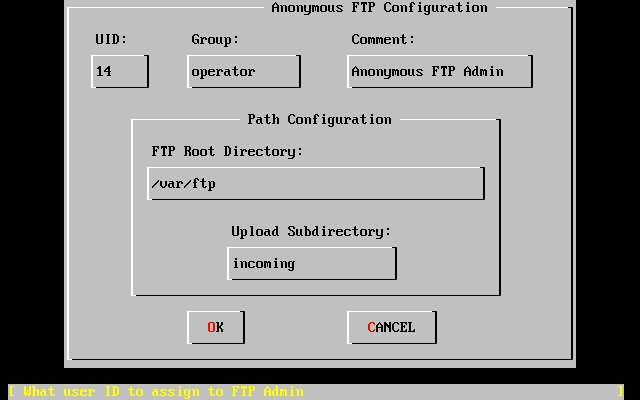
Pressing F1 will display the help:
This screen allows you to configure the anonymous FTP user.

The following configuration values are editable:

UID:     The user ID you wish to assign to the anonymous FTP user.
         All files uploaded will be owned by this ID.

Group:   Which group you wish the anonymous FTP user to be in.

Comment: String describing this user in /etc/passwd


FTP Root Directory:

        Where files available for anonymous FTP will be kept.

Upload subdirectory:

        Where files uploaded by anonymous FTP users will go.
The ftp root directory will be put in /var by default. If you do not have enough room there for the anticipated FTP needs, the /usr directory could be used by setting the FTP Root Directory to /usr/ftp.
When you are satisfied with the values, press Enter to continue.
                          User Confirmation Requested
         Create a welcome message file for anonymous FTP users?

                              [ Yes ]    No
If you select [ Yes ] and press Enter, an editor will automatically start allowing you to edit the message.
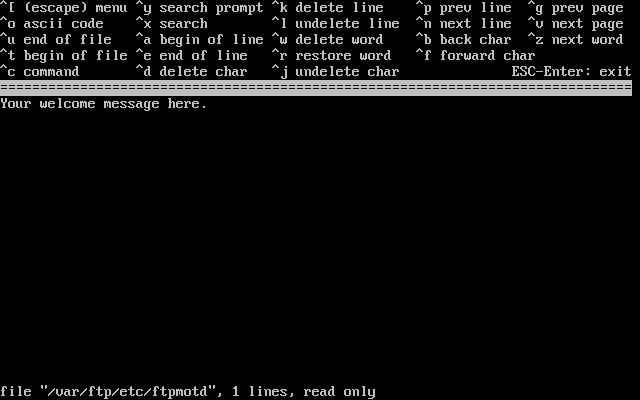
This is a text editor called ee. Use the instructions to change the message or change the message later using a text editor of your choice. Note the file name/location at the bottom of the editor screen.
Press Esc and a pop-up menu will default to a) leave editor. Press Enter to exit and continue. Press Enter again to save changes if you made any./para>
2.9.5 Configure Network File System
Network File System (NFS) allows sharing of files across a network. A machine can be configured as a server, a client, or both. Refer to Section 19.5 for a more information.
2.9.5.1 NFS Server
                       User Confirmation Requested
 Do you want to configure this machine as an NFS server?

                              Yes    [ No ]
If there is no need for a Network File System server, select [ No ] and press Enter.
If [ Yes ] is chosen, a message will pop-up indicating that the exports file must be created.
                               Message
Operating as an NFS server means that you must first configure an
/etc/exports file to indicate which hosts are allowed certain kinds of
access to your local filesystems.
Press [Enter] now to invoke an editor on /etc/exports
                               [ OK ]
Press Enter to continue. A text editor will start allowing the exports file to be created and edited.
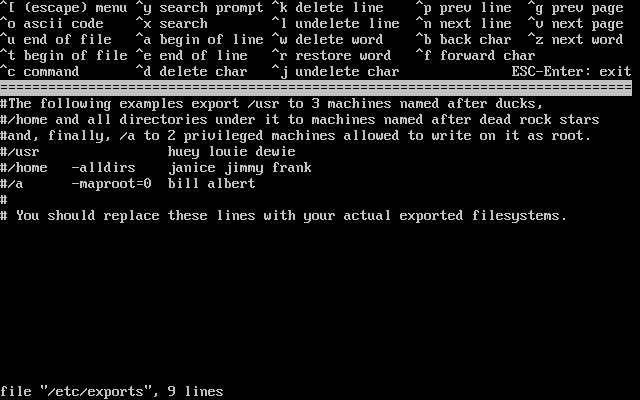
Use the instructions to add the actual exported filesystems now or later using a text editor of your choice. Note the file name/location at the bottom of the editor screen.
Press Esc and a pop-up menu will default to a) leave editor. Press Enter to exit and continue.
2.9.5.2 NFS Client
The NFS client allows your machine to access NFS servers.
                       User Confirmation Requested
 Do you want to configure this machine as an NFS client?

                              Yes   [ No ]
With the arrow keys, select [ Yes ] or [ No ] as appropriate and press Enter.
2.9.6 Security Profile
A ``security profile'' is a set of configuration options that attempts to achieve the desired ratio of security to convenience by enabling and disabling certain programs and other settings. The more severe the security profile, the fewer programs will be enabled by default. This is one of the basic principles of security: do not run anything except what you must.
Please note that the security profile is just a default setting. All programs can be enabled and disabled after you have installed FreeBSD by editing or adding the appropriate line(s) to /etc/rc.conf. For more information, please see the rc.conf(5) manual page.
The following table describes what each of the security profiles does. The columns are the choices you have for a security profile, and the rows are the program or feature that the profile enables or disables.
Table 2-4. Possible Security Profiles
| Extreme | Moderate | |
|---|---|---|
| sendmail(8) | NO | YES |
| sshd(8) | NO | YES |
| portmap(8) | NO | MAYBE [a] |
| NFS server | NO | YES |
| securelevel(8) | YES [b] | NO |
| Notes: a. The portmapper is enabled if the machine has been configured as an NFS client or server earlier in the installation. b. If you choose a security profile that sets the securelevel to ``Extreme'' or ``High'', you must be aware of the implications. Please read the init(8) manual page and pay particular attention to the meanings of the security levels, or you may have significant trouble later! |
||
                       User Confirmation Requested
 Do you want to select a default security profile for this host (select
 No for "medium" security)?

                            [ Yes ]    No
Selecting [ No ] and pressing Enter will set the security profile to medium.
Selecting [ Yes ] and pressing Enter will allow selecting a different security profile.
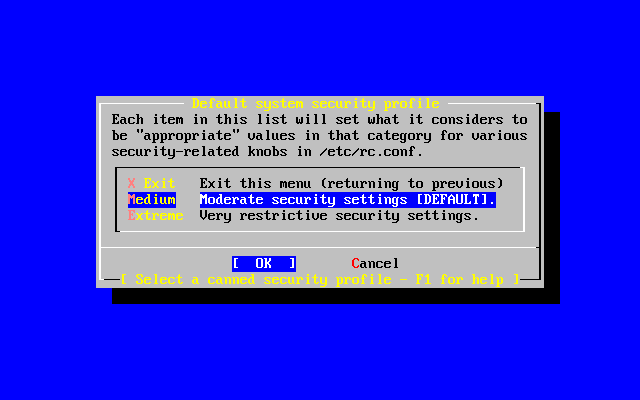
Press F1 to display the help. Press Enter to return to selection menu.
Use the arrow keys to choose Medium unless your are sure that another level is required for your needs. With [ OK ] highlighted, press Enter.
An appropriate confirmation message will display depending on which security setting was chosen.
                                 Message

Moderate security settings have been selected.

Sendmail and SSHd have been enabled, securelevels are
disabled, and NFS server setting have been left intact.
PLEASE NOTE that this still does not save you from having
to properly secure your system in other ways or exercise
due diligence in your administration, this simply picks
a standard set of out-of-box defaults to start with.

To change any of these settings later, edit /etc/rc.conf

                                  [OK]
                                 Message

Extreme security settings have been selected.

Sendmail, SSHd, and NFS services have been disabled, and
securelevels have been enabled.
PLEASE NOTE that this still does not save you from having
to properly secure your system in other ways or exercise
due diligence in your administration, this simply picks
a more secure set of out-of-box defaults to start with.

To change any of these settings later, edit /etc/rc.conf

                                  [OK]
Press Enter to continue with the post-installation configuration.
Warning: The security profile is not a silver bullet! Even if you use the extreme setting, you need to keep up with security issues by reading an appropriate mailing list, using good passwords and passphrases, and generally adhering to good security practices. It simply sets up the desired security to convenience ratio out of the box.
2.9.7 System Console Settings
There are several options available to customize the system console.
                      User Confirmation Requested
       Would you like to customize your system console settings?

                              [ Yes ]  No
To view and configure the options, select [ Yes ] and press Enter.
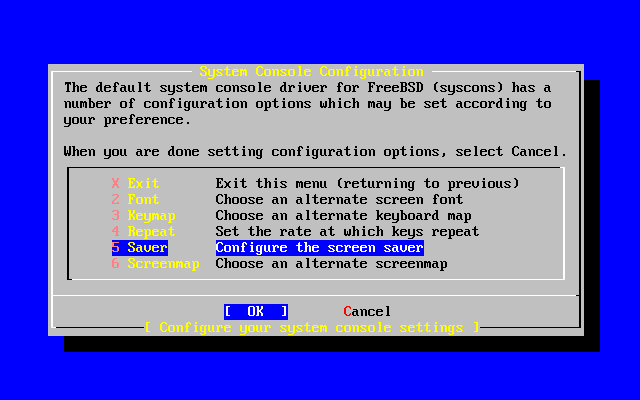
A commonly used option is the screen saver. Use the arrow keys to select Saver and then press Enter.
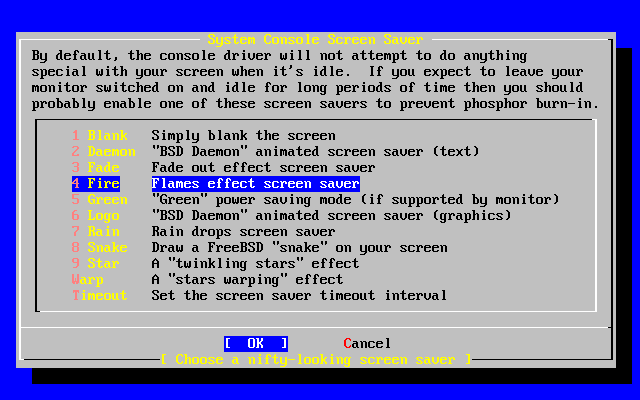
Select the desired screen saver using the arrow keys and then press Enter. The System Console Configuration menu will redisplay.
The default time interval is 300 seconds. To change the time interval, select Saver again. At the Screen Saver Options menu, select Timeout using the arrow keys and press Enter. A pop-up menu will appear:
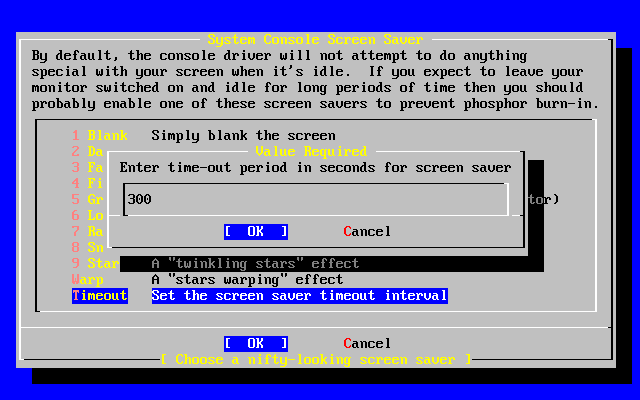
The value can be changed, then select [ OK ] and press Enter to return to the System Console Configuration menu.
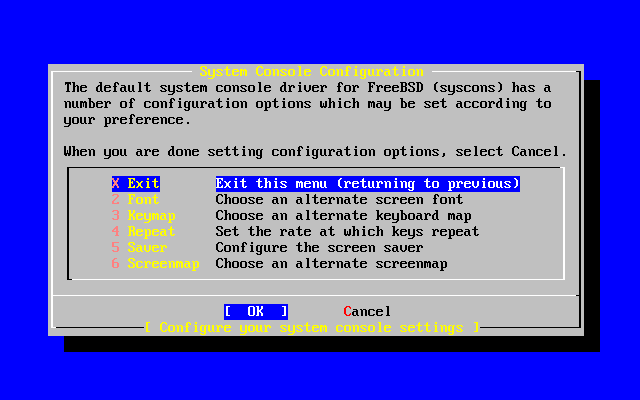
Selecting Exit and pressing Enter will continue with the post-installation configurations.
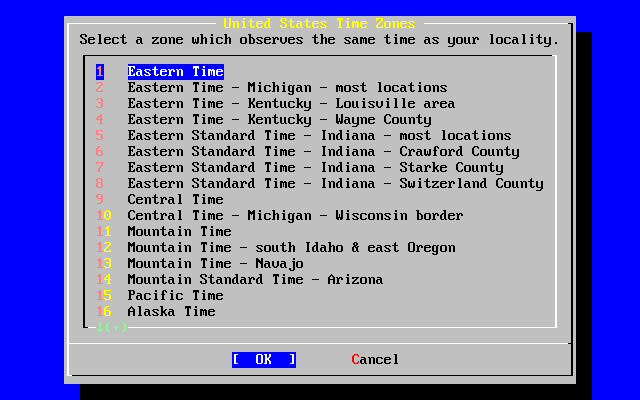
2.9.8 Setting the Time Zone
Setting the time zone for your machine will allow it to automatically correct for any regional time changes and perform other time zone related functions properly.
The example shown is for a machine located in the Eastern time zone of the United States. Your selections will vary according to your geographical location.
                      User Confirmation Requested
          Would you like to set this machine's time zone now?

                            [ Yes ]   No
Select [ Yes ] and press Enter to set the time zone.
                       User Confirmation Requested
 Is this machine's CMOS clock set to UTC? If it is set to local time
 or you don't know, please choose NO here!

                              Yes   [ No ]
Select [ Yes ] or [ No ] according to how the machine's clock is configured and press Enter.
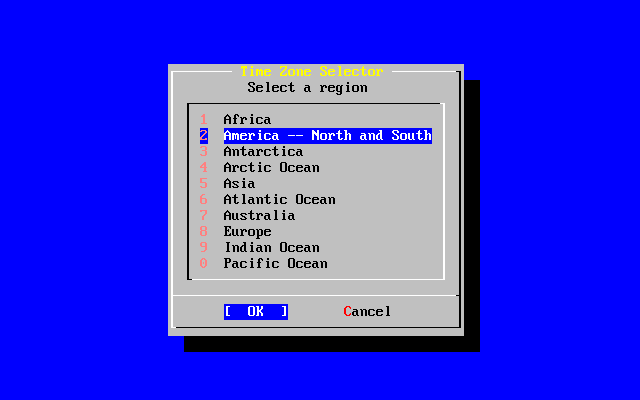
The appropriate region is selected using the arrow keys and then pressing Enter.

Select the appropriate country using the arrow keys and press Enter.
The appropriate time zone is selected using the arrow keys and pressing Enter.
                            Confirmation
            Does the abbreviation 'EDT' look reasonable?

                            [ Yes ]   No
Confirm the abbreviation for the time zone is correct. If it looks okay, press Enter to continue with the post-installation configuration.
2.9.9 Linux Compatibility
                      User Confirmation Requested
          Would you like to enable Linux binary compatibility?

                            [ Yes ]   No
Selecting [ Yes ] and pressing Enter will allow running Linux software on FreeBSD. The install will add the appropriate packages for Linux compatibility.
If installing by FTP, the machine will need to be connected to the Internet. Sometimes a remote ftp site will not have all the distributions like the Linux binary compatibility. This can be installed later if necessary.
2.9.10 Mouse Settings
This option will allow you to cut and paste text in the console and user programs with a 3-button mouse. If using a 2-button mouse, refer to manual page, moused(8), after installation for details on emulating the 3-button style. This example depicts a non-USB mouse configuration (such as a PS/2 or COM port mouse):
                      User Confirmation Requested
         Does this system have a non-USB mouse attached to it?

                            [ Yes ]    No
Select [ Yes ] for a non-USB mouse or [ No ] for a USB mouse and press Enter.
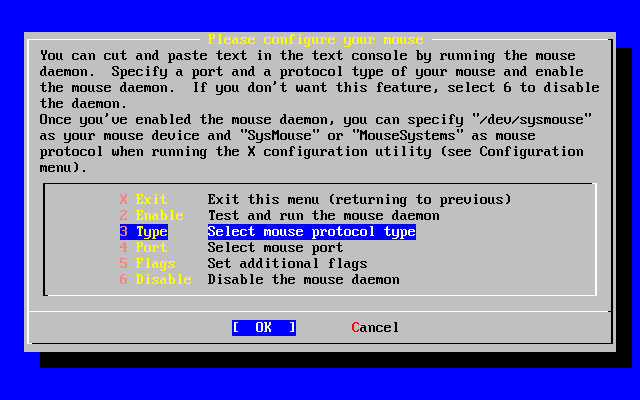
Use the arrow keys to select Type and press Enter.
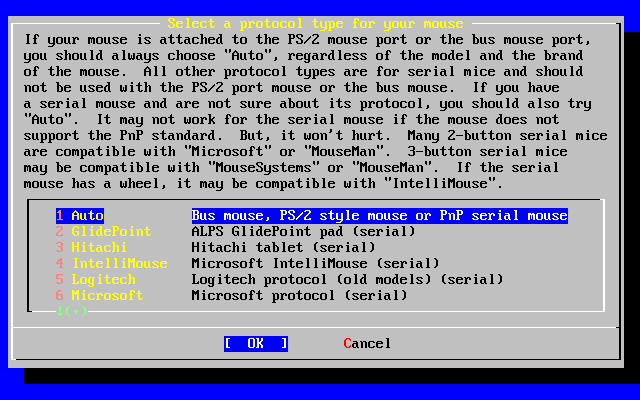
The mouse used in this example is a PS/2 type, so the default Auto was appropriate. To change protocol, use the arrow keys to select another option. Ensure that [ OK ] is highlighted and press Enter to exit this menu.
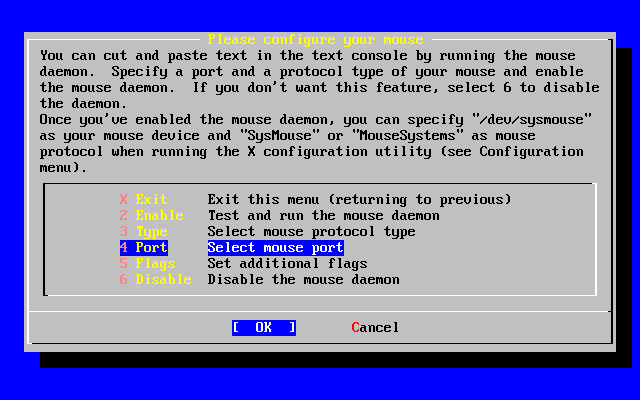
Use the arrow keys to select Port and press Enter.
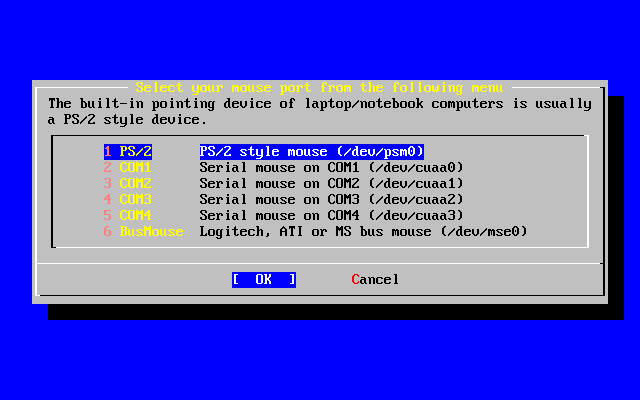
This system had a PS/2 mouse, so the default PS/2 was appropriate. To change the port, use the arrow keys and then press Enter.
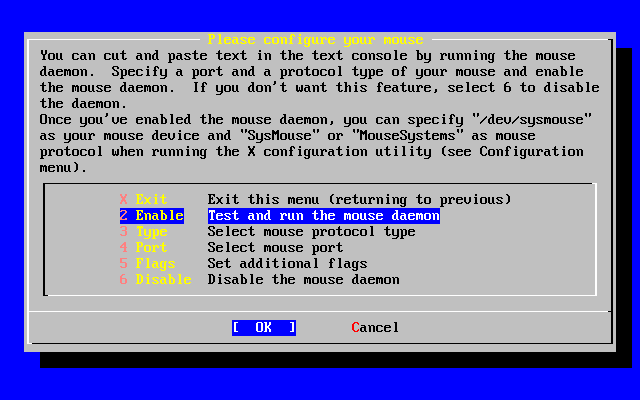
Last, use the arrow keys to select Enable, and press Enter to enable and test the mouse daemon.
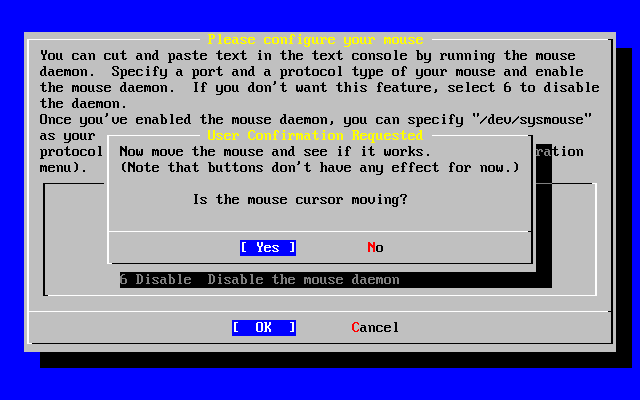
Move the mouse around the sceren and verify the cursor shown responds properly. If it does, select Yes and press Enter. If not, the mouse has not been configured correctly -- select No and try using different configuration options.
Select Exit with the arrow keys and press Enter to return to continue with the post-installation configuration.
2.9.11 Configure Additional Network Services
Configuring network services can be a daunting task for new users if they lack previous knowledge in this area. Networking, including the Internet, is critical to all modern operating systems including FreeBSD; as a result, it's very useful to have some understanding FreeBSD's extensive networking capabilities. Doing this during the installation will ensure users have some understanding of the various services available to them.
Network services are programs that accept input from anywhere on the network. Every effort is made to make sure these programs will not do anything ``harmful''. Unfortunately, programmers are not perfect and through time there have been cases where bugs in network services have been exploited by attackers to do bad things. It is important that you only enable the network services you know that you need. If in doubt it is best if you do not enable a network service until you find out that you do need it. You can always enable it later by re-running sysinstall or by using the features provided by the /etc/rc.conf file.
Selecting the ``Networking'' option will display a menu similar to the one below:
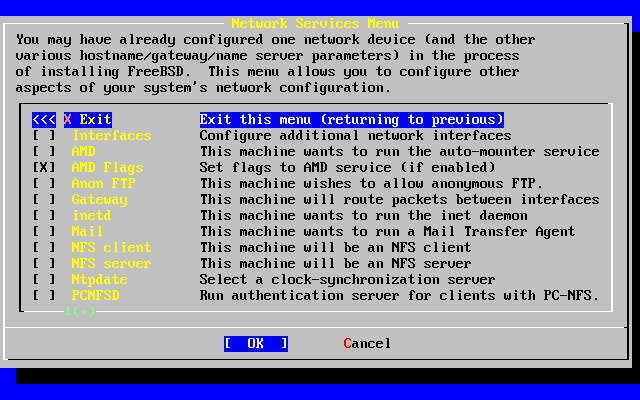
The first option, Interfaces, was previously covered during the Network Device Configuration section; thus this option can safely be ignored.
Selecting the AMD option adds support for the BSD auto mount utility. This is usually used in conjunction with the NFS protocol (see below) for automatically mounting remote file systems. No special configuration is required here.
Next in line is the AMD flags option. When selected, a menu will pop up for you to enter specific AMD flags. The menu already contains a set of default options:
-a /.amd_mnt -l syslog /host /etc/amd.map /net /etc/amd.map
The -a option sets the default mount location which is specified here as /.amd_mnt. The -l option specifies the default log file; however, when syslogd is specified all log activity will be sent to the system log daemon. The /host directory is used to mount an exported file system from a remote host, while /net directory is used to mount an exported file system from an IP address. The /etc/amd.map file defines the default options for AMD exports.
The Anon FTP permits anonymous FTP connections. Select this option to make this machine an anonymous FTP server. Be aware of the security risks involved with this option. Another menu will be displayed to explain the security risks and configuration in depth.
The Gateway configuration menu will set the machine up to be a gateway as explained previously. This can be used to unset the gateway option if you accidentally selected it during the installation process.
The Inetd option can be used to configure or completely disable the inetd(8) daemon as discussed above.
The Mail is used to configure the system's default MTA or Mail Transfer Agent. Selecting this option will bring up the following menu:
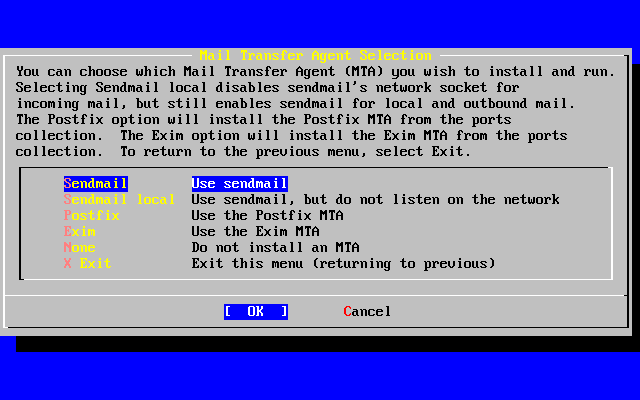
Here you are offered a choice as to which MTA to install and set as the default. An MTA is nothing more than a mail server which delivers email to users on the system or the Internet.
Selecting Sendmail will install the popular Sendmail server which is the FreeBSD default. The Sendmail local option will set Sendmail to be the default MTA, but disable its ability to receive incoming email from the Internet. The other options here, Postfix and Exim act similar to Sendmail. They both deliver email; however, some users prefer these alternatives to the Sendmail MTA.
After selecting an MTA, or choosing not to select an MTA, the network configuration menu will appear with the next option being NFS client.
The NFS client will configure the system to communicate with a server via NFS. An NFS server makes file systems available to other machines on the network via the NFS protocol. If this is a stand alone machine, this option can remain unselected. The system may require more configuration later; see Section 19.5 for more information about client and server configuration.
Below that option is the NFS server option, permitting you to set the system up as an NFS server. This adds the required information to start up the RPC remote procedure call services. RPC is used to coordinate connections between hosts and programs.
Next in line is the Ntpdate option, which deals with time synchronization. When selected, a menu like the one below shows up:
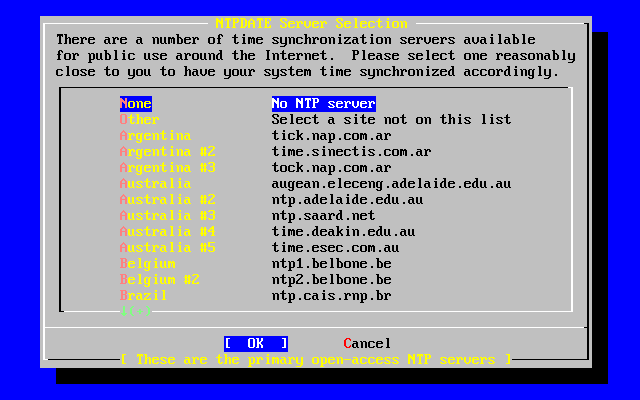
From this menu, select the server which is the closest to your location. Selecting a close one will make the time synchronization more accurate as a server further from your location may have more connection latency.
The next option is the PCNFSD selection. This option will install the net/pcnfsd package from the ports collection. This is a useful utility which provides NFS authentication services for systems which are unable to provide their own, such as Microsoft's DOS operating system.
Now you must scroll down a bit to see the other options:
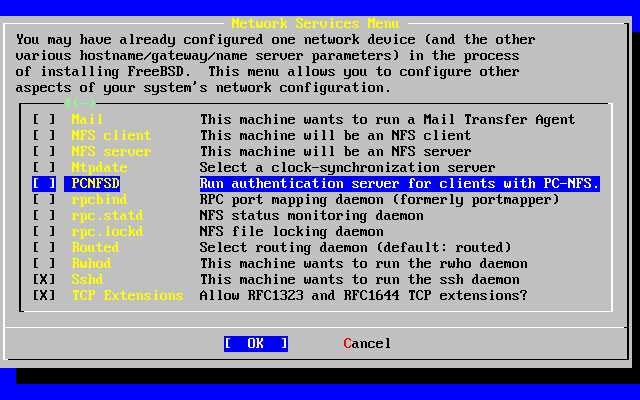
The rpcbind(8), rpc.statd(8), and rpc.lockd(8) utilities are all used for Remote Procedure Calls (RPC). The rpcbind.8 utility manages communication between NFS servers and clients, and is required for NFS servers to operate correctly. The rpc.statd daemon interacts with the rpc.statd daemon on other hosts to provide status monitoring. The reported status is usually held in the /var/db/statd.status file. The final option listed here is the rpc.lockd option, which, when selected, will provide file locking services. This is usually used with rpc.statd to monitor what hosts are requesting locks and how frequently they request them. While these last two options are marvelous for debugging, they are not required for NFS servers and clients to operate correctly.
As you progress down the list the next item here is Routed, which is the routing daemon. The routed(8) utility manages network routing tables, discovers multicast routers, and supplies a copy of the routing tables to any physically connected host on the network upon request. This is mainly used for machines which act as a gateway for the local network (see the icmp(4) and udp(4) manual pages). When selected, a menu will be presented requesting the default location of the utility. The default location is already defined for you and can be selected with the Enter key. You will then be presented with yet another menu, this time asking for the flags you wish to pass on to routed. The default is -q and it should already appear on the screen.
Next in line is the Rwhod option which, when selected, will start the rwhod(8) daemon during system initialization. The rwhod utility broadcasts system messages across the network periodically, or collects them when in ``consumer'' mode. More information can be found in the ruptime(1) and rwho(1) manual pages.
The next to the last option in the list is for the sshd(8) daemon. This is the secure shell server for OpenSSH and it is highly recommended over the standard telnet and FTP servers. The sshd server is used to create a secure connection from one host to another by using encrypted connections.
Finally there is the TCP Extensions option. This enables the TCP Extensions defined in RFC 1323 and RFC 1644. While on many hosts this can speed up connections, it can also cause some connections to be dropped. It is not recommended for servers, but may be beneficial for stand alone machines.
Now that you have configured the network services, you can scroll up to the very top item which is Exit and continue on to the next configuration section.
2.9.12 Configure X Server
In order to use a graphical user interface such as KDE, GNOME, or others, the X server will need to be configured.
Note: In order to run XFree86™ as a non root user you will need to have x11/wrapper installed. This is installed by default beginning with FreeBSD 4.7. For earlier versions this can be added from the Package Selection menu.
To see whether your video card is supported, check the XFree86 web site.
                      User Confirmation Requested
        Would you like to configure your X server at this time?

                            [ Yes ]   No
Warning: It is necessary to know your monitor specifications and video card information. Equipment damage can occur if settings are incorrect. If you do not have this information, select [ No ] and perform the configuration after installation when you have the information using /stand/sysinstall, selecting Configure and then XFree86. Improper configuration of the X server at this time can leave the machine in a frozen state. It is often advised to configure the X-server once the installation has completed.
If you have graphics card and monitor information, select [ Yes ] and press Enter to proceed with configuring the X server.
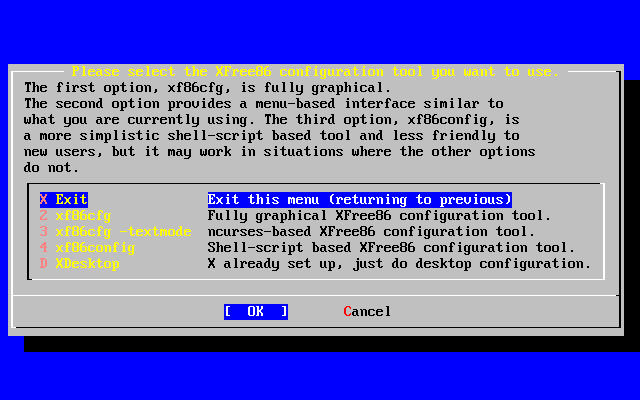
There are several ways to configure the X server. Use the arrow keys to select one of the methods and press Enter. Be sure to read all instructions carefully.
The xf86cfg and xf86cfg -textmode methods may make the screen go dark and take a few seconds to start. Be patient.
The following will illustrate the use of the xf86config configuration tool. The configuration choices you make will depend on the hardware in the system so your choices will probably be different than those shown:
                                Message
 You have configured and been running the mouse daemon.
 Choose "/dev/sysmouse" as the mouse port and "SysMouse" or
 "MouseSystems" as the mouse protocol in the X configuration utility.

                                 [ OK ]

                      [ Press enter to continue ]
This indicates that the mouse daemon previously configured has been detected. Press Enter to continue.
Starting xf86config will display a brief introduction:
This program will create a basic XF86Config file, based on menu selections you
make.

The XF86Config file usually resides in /usr/X11R6/etc/X11 or /etc/X11. A sample
XF86Config file is supplied with XFree86; it is configured for a standard
VGA card and monitor with 640x480 resolution. This program will ask for a
pathname when it is ready to write the file.

You can either take the sample XF86Config as a base and edit it for your
configuration, or let this program produce a base XF86Config file for your
configuration and fine-tune it.

Before continuing with this program, make sure you know what video card
you have, and preferably also the chipset it uses and the amount of video
memory on your video card. SuperProbe may be able to help with this.

Press enter to continue, or ctrl-c to abort.
Pressing Enter will start the mouse configuration. Be sure to follow the instructions and use ``Mouse Systems'' as the mouse protocol and /dev/sysmouse as the mouse port even if using a PS/2 mouse is shown as an illustration.
First specify a mouse protocol type. Choose one from the following list:

 1.  Microsoft compatible (2-button protocol)
 2.  Mouse Systems (3-button protocol) & FreeBSD moused protocol
 3.  Bus Mouse
 4.  PS/2 Mouse
 5.  Logitech Mouse (serial, old type, Logitech protocol)
 6.  Logitech MouseMan (Microsoft compatible)
 7.  MM Series
 8.  MM HitTablet
 9.  Microsoft IntelliMouse

If you have a two-button mouse, it is most likely of type 1, and if you have
a three-button mouse, it can probably support both protocol 1 and 2. There are
two main varieties of the latter type: mice with a switch to select the
protocol, and mice that default to 1 and require a button to be held at
boot-time to select protocol 2. Some mice can be convinced to do 2 by sending
a special sequence to the serial port (see the ClearDTR/ClearRTS options).

Enter a protocol number: 2

You have selected a Mouse Systems protocol mouse. If your mouse is normally
in Microsoft-compatible mode, enabling the ClearDTR and ClearRTS options
may cause it to switch to Mouse Systems mode when the server starts.

Please answer the following question with either 'y' or 'n'.
Do you want to enable ClearDTR and ClearRTS? n

You have selected a three-button mouse protocol. It is recommended that you
do not enable Emulate3Buttons, unless the third button doesn't work.

Please answer the following question with either 'y' or 'n'.
Do you want to enable Emulate3Buttons? y

Now give the full device name that the mouse is connected to, for example
/dev/tty00. Just pressing enter will use the default, /dev/mouse.
On FreeBSD, the default is /dev/sysmouse.

Mouse device: /dev/sysmouse
The keyboard is the next item to be configured. A generic 101-key model is shown for illustration. Any name may be used for the variant or simply press Enter to accept the default value.
Please select one of the following keyboard types that is the better
description of your keyboard. If nothing really matches,
choose 1 (Generic 101-key PC)

  1  Generic 101-key PC
  2  Generic 102-key (Intl) PC
  3  Generic 104-key PC
  4  Generic 105-key (Intl) PC
  5  Dell 101-key PC
  6  Everex STEPnote
  7  Keytronic FlexPro
  8  Microsoft Natural
  9  Northgate OmniKey 101
 10  Winbook Model XP5
 11  Japanese 106-key
 12  PC-98xx Series
 13  Brazilian ABNT2
 14  HP Internet
 15  Logitech iTouch
 16  Logitech Cordless Desktop Pro
 17  Logitech Internet Keyboard
 18  Logitech Internet Navigator Keyboard
 19  Compaq Internet
 20  Microsoft Natural Pro
 21  Genius Comfy KB-16M
 22  IBM Rapid Access
 23  IBM Rapid Access II
 24  Chicony Internet Keyboard
 25  Dell Internet Keyboard

Enter a number to choose the keyboard.

1


Please select the layout corresponding to your keyboard


  1  U.S. English
  2  U.S. English w/ ISO9995-3
  3  U.S. English w/ deadkeys
  4  Albanian
  5  Arabic
  6  Armenian
  7  Azerbaidjani
  8  Belarusian
  9  Belgian
 10  Bengali
 11  Brazilian
 12  Bulgarian
 13  Burmese
 14  Canadian
 15  Croatian
 16  Czech
 17  Czech (qwerty)
 18  Danish

Enter a number to choose the country.
Press enter for the next page

1


Please enter a variant name for 'us' layout. Or just press enter
for default variant

us


Please answer the following question with either 'y' or 'n'.
Do you want to select additional XKB options (group switcher,
group indicator, etc.)? n
Next, we proceed to the configuration for the monitor. Do not exceed the ratings of your monitor. Damage could occur. If you have any doubts, do the configuration after you have the information.
Now we want to set the specifications of the monitor. The two critical
parameters are the vertical refresh rate, which is the rate at which the
whole screen is refreshed, and most importantly the horizontal sync rate,
which is the rate at which scanlines are displayed.

The valid range for horizontal sync and vertical sync should be documented
in the manual of your monitor. If in doubt, check the monitor database
/usr/X11R6/lib/X11/doc/Monitors to see if your monitor is there.

Press enter to continue, or ctrl-c to abort.


You must indicate the horizontal sync range of your monitor. You can either
select one of the predefined ranges below that correspond to industry-
standard monitor types, or give a specific range.

It is VERY IMPORTANT that you do not specify a monitor type with a horizontal
sync range that is beyond the capabilities of your monitor. If in doubt,
choose a conservative setting.

    hsync in kHz; monitor type with characteristic modes
 1  31.5; Standard VGA, 640x480 @ 60 Hz
 2  31.5 - 35.1; Super VGA, 800x600 @ 56 Hz
 3  31.5, 35.5; 8514 Compatible, 1024x768 @ 87 Hz interlaced (no 800x600)
 4  31.5, 35.15, 35.5; Super VGA, 1024x768 @ 87 Hz interlaced, 800x600 @ 56 Hz
 5  31.5 - 37.9; Extended Super VGA, 800x600 @ 60 Hz, 640x480 @ 72 Hz
 6  31.5 - 48.5; Non-Interlaced SVGA, 1024x768 @ 60 Hz, 800x600 @ 72 Hz
 7  31.5 - 57.0; High Frequency SVGA, 1024x768 @ 70 Hz
 8  31.5 - 64.3; Monitor that can do 1280x1024 @ 60 Hz
 9  31.5 - 79.0; Monitor that can do 1280x1024 @ 74 Hz
10  31.5 - 82.0; Monitor that can do 1280x1024 @ 76 Hz
11  Enter your own horizontal sync range

Enter your choice (1-11): 6

You must indicate the vertical sync range of your monitor. You can either
select one of the predefined ranges below that correspond to industry-
standard monitor types, or give a specific range. For interlaced modes,
the number that counts is the high one (e.g. 87 Hz rather than 43 Hz).

 1  50-70
 2  50-90
 3  50-100
 4  40-150
 5  Enter your own vertical sync range

Enter your choice: 2

You must now enter a few identification/description strings, namely an
identifier, a vendor name, and a model name. Just pressing enter will fill
in default names.

The strings are free-form, spaces are allowed.
Enter an identifier for your monitor definition: Hitachi
The selection of a video card driver from a list is next. If you pass your card on the list, continue to press Enter and the list will repeat. Only an excerpt from the list is shown:
Now we must configure video card specific settings. At this point you can
choose to make a selection out of a database of video card definitions.
Because there can be variation in Ramdacs and clock generators even
between cards of the same model, it is not sensible to blindly copy
the settings (e.g. a Device section). For this reason, after you make a
selection, you will still be asked about the components of the card, with
the settings from the chosen database entry presented as a strong hint.

The database entries include information about the chipset, what driver to
run, the Ramdac and ClockChip, and comments that will be included in the
Device section. However, a lot of definitions only hint about what driver
to run (based on the chipset the card uses) and are untested.

If you can't find your card in the database, there's nothing to worry about.
You should only choose a database entry that is exactly the same model as
your card; choosing one that looks similar is just a bad idea (e.g. a
GemStone Snail 64 may be as different from a GemStone Snail 64+ in terms of
hardware as can be).

Do you want to look at the card database? y


288  Matrox Millennium G200 8MB                        mgag200
289  Matrox Millennium G200 SD 16MB                    mgag200
290  Matrox Millennium G200 SD 4MB                     mgag200
291  Matrox Millennium G200 SD 8MB                     mgag200
292  Matrox Millennium G400                            mgag400
293  Matrox Millennium II 16MB                         mga2164w
294  Matrox Millennium II 4MB                          mga2164w
295  Matrox Millennium II 8MB                          mga2164w
296  Matrox Mystique                                   mga1064sg
297  Matrox Mystique G200 16MB                         mgag200
298  Matrox Mystique G200 4MB                          mgag200
299  Matrox Mystique G200 8MB                          mgag200
300  Matrox Productiva G100 4MB                        mgag100
301  Matrox Productiva G100 8MB                        mgag100
302  MediaGX                                           mediagx
303  MediaVision Proaxcel 128                          ET6000
304  Mirage Z-128                                      ET6000
305  Miro CRYSTAL VRX                                  Verite 1000

Enter a number to choose the corresponding card definition.
Press enter for the next page, q to continue configuration.

288

Your selected card definition:

Identifier: Matrox Millennium G200 8MB
Chipset:    mgag200
Driver:     mga
Do NOT probe clocks or use any Clocks line.

Press enter to continue, or ctrl-c to abort.


Now you must give information about your video card. This will be used for
the "Device" section of your video card in XF86Config.

You must indicate how much video memory you have. It is probably a good
idea to use the same approximate amount as that detected by the server you
intend to use. If you encounter problems that are due to the used server
not supporting the amount memory you have (e.g. ATI Mach64 is limited to
1024K with the SVGA server), specify the maximum amount supported by the
server.

How much video memory do you have on your video card:

 1  256K
 2  512K
 3  1024K
 4  2048K
 5  4096K
 6  Other

Enter your choice: 6

Amount of video memory in Kbytes: 8192

You must now enter a few identification/description strings, namely an
identifier, a vendor name, and a model name. Just pressing enter will fill
in default names (possibly from a card definition).

Your card definition is Matrox Millennium G200 8MB.

The strings are free-form, spaces are allowed.
Enter an identifier for your video card definition:
Next, the video modes are set for the resolutions desired. Typically, useful ranges are 640x480, 800x600, and 1024x768 but those are a function of video card capability, monitor size, and eye comfort. When selecting a color depth, select the highest mode that your card will support.
For each depth, a list of modes (resolutions) is defined. The default
resolution that the server will start-up with will be the first listed
mode that can be supported by the monitor and card.
Currently it is set to:

"640x480" "800x600" "1024x768" "1280x1024" for 8-bit
"640x480" "800x600" "1024x768" "1280x1024" for 16-bit
"640x480" "800x600" "1024x768" "1280x1024" for 24-bit

Modes that cannot be supported due to monitor or clock constraints will
be automatically skipped by the server.

 1  Change the modes for 8-bit (256 colors)
 2  Change the modes for 16-bit (32K/64K colors)
 3  Change the modes for 24-bit (24-bit color)
 4  The modes are OK, continue.

Enter your choice: 2

Select modes from the following list:

 1  "640x400"
 2  "640x480"
 3  "800x600"
 4  "1024x768"
 5  "1280x1024"
 6  "320x200"
 7  "320x240"
 8  "400x300"
 9  "1152x864"
 a  "1600x1200"
 b  "1800x1400"
 c  "512x384"

Please type the digits corresponding to the modes that you want to select.
For example, 432 selects "1024x768" "800x600" "640x480", with a
default mode of 1024x768.

Which modes? 432

You can have a virtual screen (desktop), which is screen area that is larger
than the physical screen and which is panned by moving the mouse to the edge
of the screen. If you don't want virtual desktop at a certain resolution,
you cannot have modes listed that are larger. Each color depth can have a
differently-sized virtual screen

Please answer the following question with either 'y' or 'n'.
Do you want a virtual screen that is larger than the physical screen? n


For each depth, a list of modes (resolutions) is defined. The default
resolution that the server will start-up with will be the first listed
mode that can be supported by the monitor and card.
Currently it is set to:

"640x480" "800x600" "1024x768" "1280x1024" for 8-bit
"1024x768" "800x600" "640x480" for 16-bit
"640x480" "800x600" "1024x768" "1280x1024" for 24-bit

Modes that cannot be supported due to monitor or clock constraints will
be automatically skipped by the server.

 1  Change the modes for 8-bit (256 colors)
 2  Change the modes for 16-bit (32K/64K colors)
 3  Change the modes for 24-bit (24-bit color)
 4  The modes are OK, continue.

Enter your choice: 4


Please specify which color depth you want to use by default:

  1  1 bit (monochrome)
  2  4 bits (16 colors)
  3  8 bits (256 colors)
  4  16 bits (65536 colors)
  5  24 bits (16 million colors)

Enter a number to choose the default depth.

4
Finally, the configuration needs to be saved. Be sure to enter /etc/XF86Config as the location for saving the configuration.
I am going to write the XF86Config file now. Make sure you don't accidently
overwrite a previously configured one.

Shall I write it to /etc/X11/XF86Config? y
If the configuration fails, you can try the configuration again by selecting [ Yes ] when the following message appears:
          User Confirmation Requested
The XFree86 configuration process seems to have
failed.  Would you like to try again?

             [ Yes ]         No
If you have trouble configuring XFree86, select [ No ] and press Enter and continue with the installation process. After installation you can use xf86cfg -textmode or xf86config to access the command line configuration utilities as root. There is an additional method for configuring XFree86 described in Chapter 5. If you choose not to configure XFree86 at this time the next menu will be for package selection.
The default setting which allows the server to be killed is the hotkey sequence Ctrl+Alt+Backspace. This can be executed if something is wrong with the server settings and prevent hardware damage.
The default setting that allows video mode switching will permit changing of the mode while running X with the hotkey sequence Ctrl+Alt++ or Ctrl+Alt+-.
After installation, the display can be adjusted for height, width, or centering by using xvidtune after you have XFree86 running with xvidtune.
There are warnings that improper settings can damage your equipment. Heed them. If in doubt, do not do it. Instead, use the monitor controls to adjust the display for X Window. There may be some display differences when switching back to text mode, but it is better than damaging equipment.
Read the xvidtune(1) manual page before making any adjustments.
Following a successful XFree86 configuration, it will proceed to the selection of a default desktop.
2.9.13 Select Default X Desktop
There are a variety of window managers available. They range from very basic environments to full desktop environments with a large suite of software. Some require only minimal disk space and low memory while others with more features require much more. The best way to determine which is most suitable for you is to try a few different ones. Those are available from the ports collection or as packages and can be added after installation.
You can select one of the popular desktops to be installed and configured as the default desktop. This will allow you to start it right after installation.
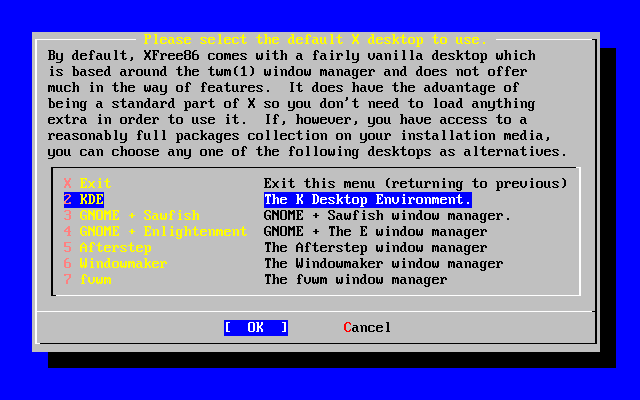
Use the arrow keys to select a desktop and press Enter. Installation of the selected desktop will proceed.
2.9.14 Install Packages
Packages are pre-compiled binaries and are a convenient way to install software.
Installation of one package is shown for purposes of illustration. Additional packages can also be added at this time if desired. After installation /stand/sysinstall can be used to add additional packages.
                     User Confirmation Requested
 The FreeBSD package collection is a collection of hundreds of
 ready-to-run applications, from text editors to games to WEB servers
 and more. Would you like to browse the collection now?

                            [ Yes ]   No
Selecting [ Yes ] and pressing Enter will be followed by the Package Selection screens:

Only packages on the current installation media are available for installation at any given time.
All packages available will be displayed if All is selected or you can select a particular category. Highlight your selection with the arrow keys and press Enter.
A menu will display showing all the packages available for the selection made:
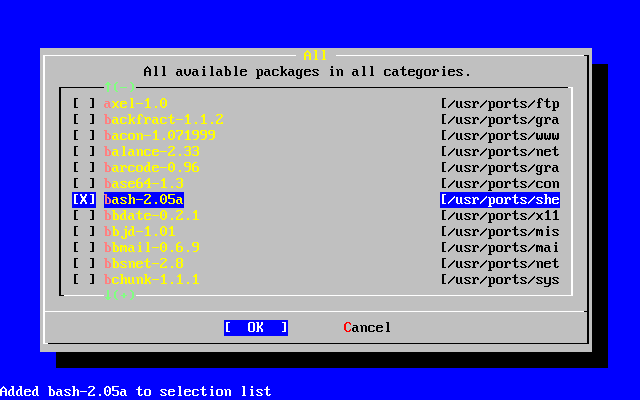
The bash shell is shown selected. Select as many as desired by highlighting the package and pressing the Space key. A short description of each package will appear in the lower left corner of the screen.
Pressing the Tab key will toggle between the last selected package, [ OK ], and [ Cancel ].
When you have finished marking the packages for installation, press Tab once to toggle to the [ OK ] and press Enter to return to the Package Selection menu.
The left and right arrow keys will also toggle between [ OK ] and [ Cancel ]. This method can also be used to select [ OK ] and press Enter to return to the Package Selection menu.
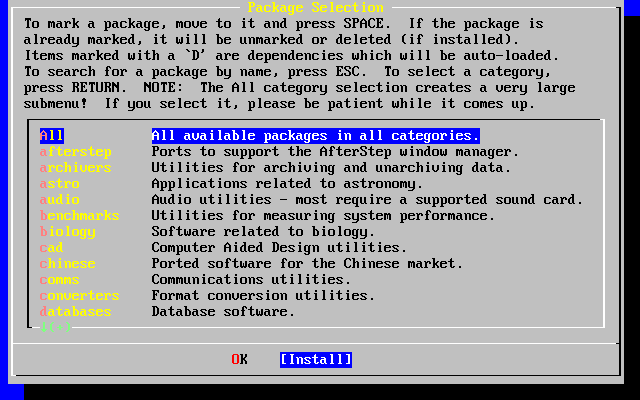
Use the tab and arrow keys to select [ Install ] and press Enter. You will then need to confirm that you want to install the packages:
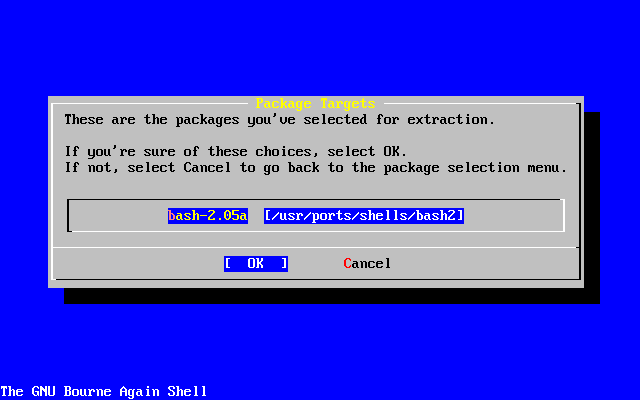
Selecting [ OK ] and pressing Enter will start the package installation. Installing messages will appear until completed. Make note if there are any error messages.
The final configuration continues after packages are installed. If you end up not selecting any packages, and wish to return to the final configuration, select Install anyways.
2.9.15 Add Users/Groups
You should add at least one user during the installation so that you can use the system without being logged in as root. The root partition is generally small and running applications as root can quickly fill it. A bigger danger is noted below:
                     User Confirmation Requested
 Would you like to add any initial user accounts to the system? Adding
 at least one account for yourself at this stage is suggested since
 working as the "root" user is dangerous (it is easy to do things which
 adversely affect the entire system).

                            [ Yes ]   No
Select [ Yes ] and press Enter to continue with adding a user.
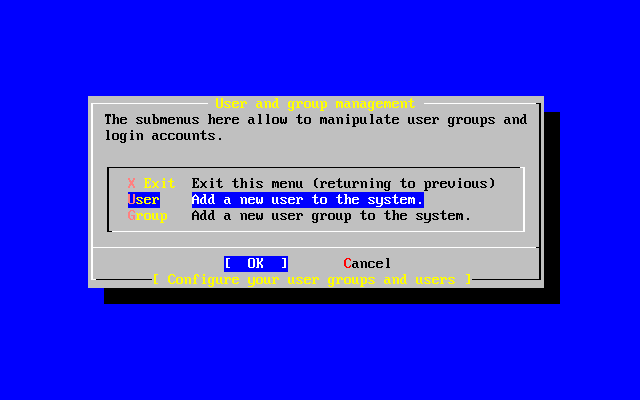
Select User with the arrow keys and press Enter.
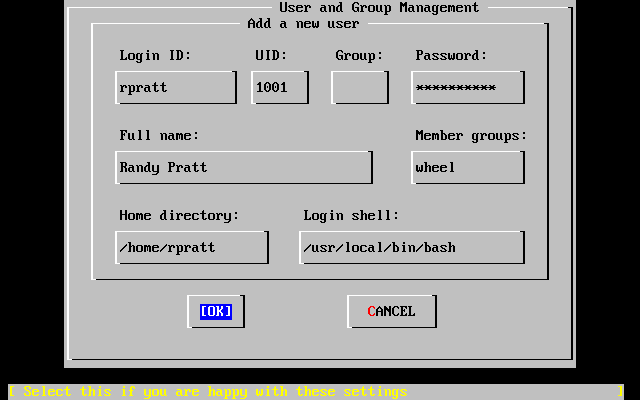
The following descriptions will appear in the lower part of the screen as the items are selected with Tab to assist with entering the required information:
- Login ID
-
The login name of the new user (mandatory).
- UID
-
The numerical ID for this user (leave blank for automatic choice).
- Group
-
The login group name for this user (leave blank for automatic choice).
- Password
-
The password for this user (enter this field with care!).
- Full name
-
The user's full name (comment).
- Member groups
-
The groups this user belongs to (i.e. gets access rights for).
- Home directory
-
The user's home directory (leave blank for default).
- Login shell
-
The user's login shell (leave blank for default, e.g. /bin/sh).
The login shell was changed from /bin/sh to /usr/local/bin/bash to use the bash shell that was previously installed as a package. Do not try to use a shell that does not exist or you will not be able to login. The most common shell used in the BSD-world is the C shell, which can be indicated as /bin/tcsh.
The user was also added to the wheel group to be able to become a superuser with root privileges.
When you are satisfied, press [ OK ] and the User and Group Management menu will redisplay:
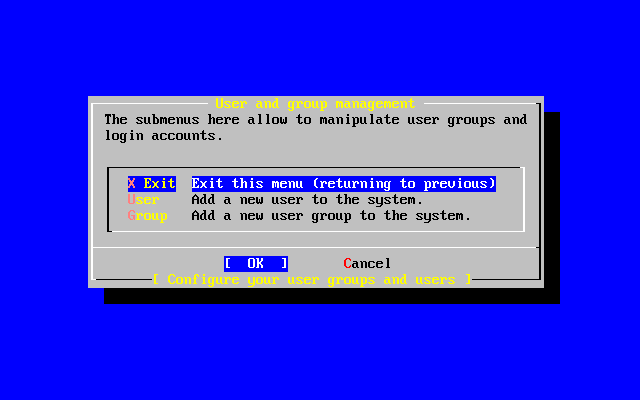
Groups can also be added at this time if specific needs are known. Otherwise, this may be accessed through using /stand/sysinstall after installation is completed.
When you are finished adding users, select Exit with the arrow keys and press Enter to continue the installation.
2.9.16 Set the root Password
                        Message
 Now you must set the system manager's password.
 This is the password you'll use to log in as "root".

                         [ OK ]

               [ Press enter to continue ]
Press Enter to set the root password.
The password will need to be typed in twice correctly. Needless to say, make sure you have a way of finding the password if you forget.
Changing local password for root.
New password :
Retype new password :
The installation will continue after the password is successfully entered.
2.9.17 Exiting Install
If you need to configure additional network devices or any other configuration, you can do it at this point or after installation with /stand/sysinstall.
                     User Confirmation Requested
 Visit the general configuration menu for a chance to set any last
 options?

                              Yes   [ No ]
Select [ No ] with the arrow keys and press Enter to return to the Main Installation Menu.
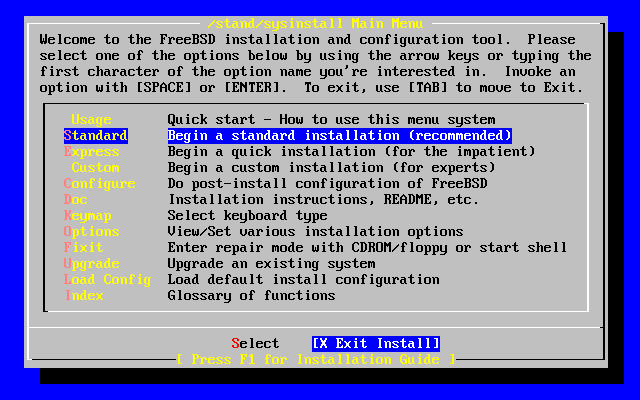
Select [X Exit Install] with the arrow keys and press Enter. You will be asked to confirm exiting the installation:
                     User Confirmation Requested
 Are you sure you wish to exit? The system will reboot (be sure to
 remove any floppies from the drives).

                            [ Yes ]   No
Select [ Yes ] and remove the floppy if booting from the floppy. The CDROM drive is locked until the machine starts to reboot. The CDROM drive is then unlocked and the disk can be removed from drive (quickly).
The system will reboot so watch for any error messages that may appear.
2.9.18 FreeBSD Bootup
2.9.18.1 FreeBSD Bootup on the i386™
If everything went well, you will see messages scroll off the screen and you will arrive at a login prompt. You can view the content of the messages by pressing Scroll-Lock and using PgUp and PgDn. Pressing Scroll-Lock again will return to the prompt.
The entire message may not display (buffer limitation) but it can be viewed from the command line after logging in by typing dmesg at the prompt.
Login using the username/password you set during installation (rpratt, in this example). Avoid logging in as root except when necessary.
Typical boot messages (version information omitted):
Copyright (c) 1992-2002 The FreeBSD Project.
Copyright (c) 1979, 1980, 1983, 1986, 1988, 1989, 1991, 1992, 1993, 1994
        The Regents of the University of California. All rights reserved.

Timecounter "i8254"  frequency 1193182 Hz
CPU: AMD-K6(tm) 3D processor (300.68-MHz 586-class CPU)
  Origin = "AuthenticAMD"  Id = 0x580  Stepping = 0
  Features=0x8001bf<FPU,VME,DE,PSE,TSC,MSR,MCE,CX8,MMX>
  AMD Features=0x80000800<SYSCALL,3DNow!>
real memory  = 268435456 (262144K bytes)
config> di sn0
config> di lnc0
config> di le0
config> di ie0
config> di fe0
config> di cs0
config> di bt0
config> di aic0
config> di aha0
config> di adv0
config> q
avail memory = 256311296 (250304K bytes)
Preloaded elf kernel "kernel" at 0xc0491000.
Preloaded userconfig_script "/boot/kernel.conf" at 0xc049109c.
md0: Malloc disk
Using $PIR table, 4 entries at 0xc00fde60
npx0: <math processor> on motherboard
npx0: INT 16 interface
pcib0: <Host to PCI bridge> on motherboard
pci0: <PCI bus> on pcib0
pcib1: <VIA 82C598MVP (Apollo MVP3) PCI-PCI (AGP) bridge> at device 1.0 on pci0
pci1: <PCI bus> on pcib1
pci1: <Matrox MGA G200 AGP graphics accelerator> at 0.0 irq 11
isab0: <VIA 82C586 PCI-ISA bridge> at device 7.0 on pci0
isa0: <ISA bus> on isab0
atapci0: <VIA 82C586 ATA33 controller> port 0xe000-0xe00f at device 7.1 on pci0
ata0: at 0x1f0 irq 14 on atapci0
ata1: at 0x170 irq 15 on atapci0
uhci0: <VIA 83C572 USB controller> port 0xe400-0xe41f irq 10 at device 7.2 on pci0
usb0: <VIA 83C572 USB controller> on uhci0
usb0: USB revision 1.0
uhub0: VIA UHCI root hub, class 9/0, rev 1.00/1.00, addr 1
uhub0: 2 ports with 2 removable, self powered
chip1: <VIA 82C586B ACPI interface> at device 7.3 on pci0
ed0: <NE2000 PCI Ethernet (RealTek 8029)> port 0xe800-0xe81f irq 9 at
device 10.0 on pci0
ed0: address 52:54:05:de:73:1b, type NE2000 (16 bit)
isa0: too many dependant configs (8)
isa0: unexpected small tag 14
fdc0: <NEC 72065B or clone> at port 0x3f0-0x3f5,0x3f7 irq 6 drq 2 on isa0
fdc0: FIFO enabled, 8 bytes threshold
fd0: <1440-KB 3.5" drive> on fdc0 drive 0
atkbdc0: <keyboard controller (i8042)> at port 0x60-0x64 on isa0
atkbd0: <AT Keyboard> flags 0x1 irq 1 on atkbdc0
kbd0 at atkbd0
psm0: <PS/2 Mouse> irq 12 on atkbdc0
psm0: model Generic PS/2 mouse, device ID 0
vga0: <Generic ISA VGA> at port 0x3c0-0x3df iomem 0xa0000-0xbffff on isa0
sc0: <System console> at flags 0x1 on isa0
sc0: VGA <16 virtual consoles, flags=0x300>
sio0 at port 0x3f8-0x3ff irq 4 flags 0x10 on isa0
sio0: type 16550A
sio1 at port 0x2f8-0x2ff irq 3 on isa0
sio1: type 16550A
ppc0: <Parallel port> at port 0x378-0x37f irq 7 on isa0
ppc0: SMC-like chipset (ECP/EPP/PS2/NIBBLE) in COMPATIBLE mode
ppc0: FIFO with 16/16/15 bytes threshold
ppbus0: IEEE1284 device found /NIBBLE
Probing for PnP devices on ppbus0:
plip0: <PLIP network interface> on ppbus0
lpt0: <Printer> on ppbus0
lpt0: Interrupt-driven port
ppi0: <Parallel I/O> on ppbus0
ad0: 8063MB <IBM-DHEA-38451> [16383/16/63] at ata0-master using UDMA33
ad2: 8063MB <IBM-DHEA-38451> [16383/16/63] at ata1-master using UDMA33
acd0: CDROM <DELTA OTC-H101/ST3 F/W by OIPD> at ata0-slave using PIO4
Mounting root from ufs:/dev/ad0s1a
swapon: adding /dev/ad0s1b as swap device
Automatic boot in progress...
/dev/ad0s1a: FILESYSTEM CLEAN; SKIPPING CHECKS
/dev/ad0s1a: clean, 48752 free (552 frags, 6025 blocks, 0.9% fragmentation)
/dev/ad0s1f: FILESYSTEM CLEAN; SKIPPING CHECKS
/dev/ad0s1f: clean, 128997 free (21 frags, 16122 blocks, 0.0% fragmentation)
/dev/ad0s1g: FILESYSTEM CLEAN; SKIPPING CHECKS
/dev/ad0s1g: clean, 3036299 free (43175 frags, 374073 blocks, 1.3% fragmentation)
/dev/ad0s1e: filesystem CLEAN; SKIPPING CHECKS
/dev/ad0s1e: clean, 128193 free (17 frags, 16022 blocks, 0.0% fragmentation)
Doing initial network setup: hostname.
ed0: flags=8843<UP,BROADCAST,RUNNING,SIMPLEX,MULTICAST> mtu 1500
        inet 192.168.0.1 netmask 0xffffff00 broadcast 192.168.0.255
        inet6 fe80::5054::5ff::fede:731b%ed0 prefixlen 64 tentative scopeid 0x1
        ether 52:54:05:de:73:1b
lo0: flags=8049<UP,LOOPBACK,RUNNING,MULTICAST> mtu 16384
        inet6 fe80::1%lo0 prefixlen 64 scopeid 0x8
        inet6 ::1 prefixlen 128
        inet 127.0.0.1 netmask 0xff000000
Additional routing options: IP gateway=YES TCP keepalive=YES
routing daemons:.
additional daemons: syslogd.
Doing additional network setup:.
Starting final network daemons: creating ssh RSA host key
Generating public/private rsa1 key pair.
Your identification has been saved in /etc/ssh/ssh_host_key.
Your public key has been saved in /etc/ssh/ssh_host_key.pub.
The key fingerprint is:
cd:76:89:16:69:0e:d0:6e:f8:66:d0:07:26:3c:7e:2d root@k6-2.example.com
 creating ssh DSA host key
Generating public/private dsa key pair.
Your identification has been saved in /etc/ssh/ssh_host_dsa_key.
Your public key has been saved in /etc/ssh/ssh_host_dsa_key.pub.
The key fingerprint is:
f9:a1:a9:47:c4:ad:f9:8d:52:b8:b8:ff:8c:ad:2d:e6 root@k6-2.example.com.
setting ELF ldconfig path: /usr/lib /usr/lib/compat /usr/X11R6/lib
/usr/local/lib
a.out ldconfig path: /usr/lib/aout /usr/lib/compat/aout /usr/X11R6/lib/aout
starting standard daemons: inetd cron sshd usbd sendmail.
Initial rc.i386 initialization:.
rc.i386 configuring syscons: blank_time screensaver moused.
Additional ABI support: linux.
Local package initialization:.
Additional TCP options:.

FreeBSD/i386 (k6-2.example.com) (ttyv0)

login: rpratt
Password:
Generating the RSA and DSA keys may take some time on slower machines. This happens only on the initial boot-up of a new installation. Subsequent boots will be faster.
If the X server has been configured and a Default Desktop chosen, it can be started by typing startx at the command line.
2.9.18.2 Bootup of FreeBSD on the Alpha
Once the install procedure has finished, you will be able to start FreeBSD by typing something like this to the SRM prompt:
>>>BOOT DKC0
This instructs the firmware to boot the specified disk. To make FreeBSD boot automatically in the future, use these commands:
>>> SET BOOT_OSFLAGS A
>>> SET BOOT_FILE ''
>>> SET BOOTDEF_DEV DKC0
>>> SET AUTO_ACTION BOOT
The boot messages will be similar (but not identical) to those produced by FreeBSD booting on the i386™.
2.9.19 FreeBSD Shutdown
It is important to properly shutdown the operating system. Do not just turn off power. First, become a superuser by typing su at the command line and entering the root password. This will work only if the user is a member of the wheel group. Otherwise, login as root and use shutdown -h now.
The operating system has halted.
Please press any key to reboot.
It is safe to turn off the power after the shutdown command has been issued and the message ``Please press any key to reboot'' appears. If any key is pressed instead of turning off the power switch, the system will reboot.
You could also use the Ctrl+Alt+Del key combination to reboot the system, however this is not recommended during normal operation.